The problem of storing App Credentials in Azure Runbooks
Back when SharePoint on-premises was all the rage, there was always a need to provide a way of automating script actions for a number of reasons. Invariably this would mean that an automation server would be configured running Windows Scheduled tasks out of hours to access and process SharePoint data under the identity of a Service Account. This need has not gone away with SharePoint Online and if anything, with the advent of the Microsoft Graph the possibilities have increased tenfold along with the options for automating using App Credentials.
For me the simplest automation in recent times has been to use Azure Runbooks, we can use PowerShell, it has a simple to use Modules library for popular modules like PNP PowerShell,we can upload our own Modules for code re-use and we can run scripts for up to 3 hours without problems. It also integrates heavily with other services such as the Azure KeyVault for credential storage. The only problem with KeyVault is that it’s an additional cost and can be a little complex to setup and use, requiring Service Principals and Certificates. If we look back at how we ran our old on-premises Task Scheduler it was generally accepted that IDs and Passwords in Script files was not a good thing and the majority of people would use Windows Credential Manager to encode the credentials into safe storage against the logged on account. Luckily, we can do just such a thing with Windows Automation accounts, enabling us to share service credentials between a number of scripts/authors.
For the purpose of this article I’m going to assume two things, both of which are well documented on the Internet, so there’s no point me re-hashing them here:
- You have an Automation Account configured in Azure that is configured to allow a limited number of people access using Access Control.
- You have some App Credentials configured in Azure AD (A Client/Secret pair) that you wish to call the Microsoft Graph with. These must have been granted API Permissions to the Graph. (Section 2 in this Doc from Microsoft)
Storing the App Credentials in readiness for reuse.
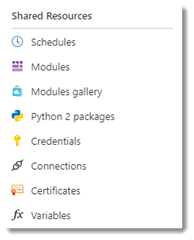
When you open your Automation Account pane in the Azure Portal, there are a number of resources down the left hand side that you’ll be using, The section that we’re interested in for this post is under Shared Resources. This is the section where we publish Schedules for our scripts, make modules available, and more importantly let us store and share credentials and variables between our Runbooks.
When I first looked at Runbooks, I immediately jumped on Credentials and started trying to use these for my scripts, storing the App Credentials as if they were a UserName and Password. The big problem with this is that the Password is encrypted and it is very difficult to pass this into our automation calls without writing an overly complex script. The much simpler approach is to use Automation Variables instead.
“How is that secure””?” you may well ask. Well the answer to that lies in how the Automation accounts let’s you declare a Variable as an Encrypted variable, for which the value is not shown in the interface once it’s been committed. Whilst an author with the correct rights can obtain the value (which is kind of the point as we need to be able to pass a string to the Graph), it reduces the amount of visibility to a casual observer.
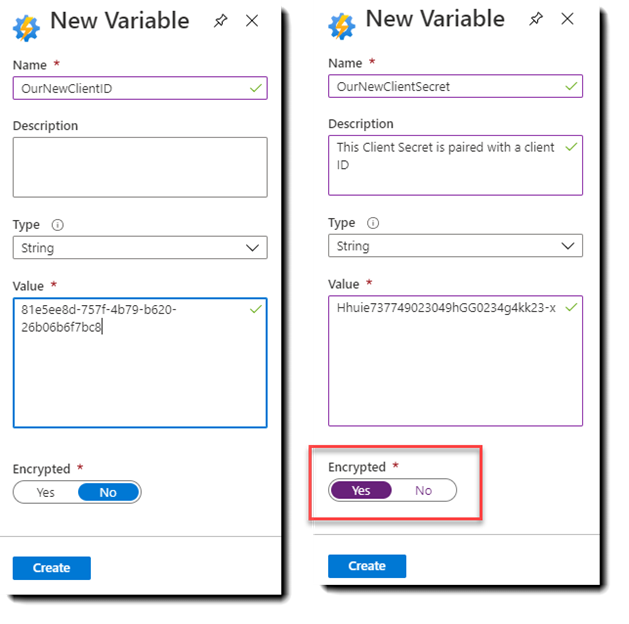
To add these, simply click on the “+ Add a variable” at the top of the screen and first add your ClientID as a string and hit Create, then do exactly the same for your Client Secret, but this time, click on the Encrypted toggle at the bottom of the pane, then hit Create.
You’ll notice that the boxes turn purple and when you return to the Credentials screen, you can only see the ID of the ClientID and not the Secret. With those saved, we can now turn our attention to using them in the Runbook itself.
Consuming our Automation Variables in a Runbook
This really is the simple part as we use a single Azure Cmdlet to obtain our values in readiness to plug them into the Rest call to the Graph to create our token.
Get-AutomationVariable
$ClientID = get-automationvariable  -name "OurNewClientID"
$clientSecret = get-automationvariable -name "OurNewClientSecret"
That call handles all of the decryption that we need and gives us simple string variables to inject into the Rest call to the graph (detailed in section 4 of this MIcrosoft doc) and for simplicity, in this function that I use in most of my scripts.
function get-oAuthAccessToken()
{
    Param(
        [Parameter(Mandatory=$true)] [String] $resource,
        [Parameter(Mandatory=$true)] [String] $clientID,
        [Parameter(Mandatory=$true)] [String] $clientSecret,
        [Parameter(Mandatory=$true)] [String] $loginURL,
        [Parameter(Mandatory=$true)] [String] $tenantDomain
    )

    # Retrieve Oauth 2 access token
    $body = @{grant_type="client_credentials";resource=$resource;client_id=$clientID;client_secret=$clientSecret}
    $oauthToken = Invoke-RestMethod -Method Post -Uri $loginURL/$tenantdomain/oauth2/token?api-version=1.0 -Body $body

    return $oauthToken
}
Call this using your new ClientID and ClientSecret values, along with the following EndPoints:
#oAuth Token Endpoints.
$resourceAPI = "https://graph.microsoft.com"
$loginURL = "https://login.windows.net"
$apiPrefix = "https://graph.microsoft.com/v1.0/"
$tenantDomain = "<<yourdomain>>.onmicrosoft.com"
I hope this proves useful.
Paul.


