In my post yesterday about the public preview of Site Sensitivity Labels in office 365, I said I’d do another post about how these work and what’s required to get these working in your tenant. This is kind of important as the current documentation does NOT tell you what to configure in Conditional Access to get this working. You must also have Azure AD P1 licenses for everyone who will be subject to Site Sensitivity label as it required Azure AD Conditional Access to work.
Just an FYI.. you must have Azure AD P1 for anyone subject to site sensitivity labels as it requires Azure AD Conditional Access to work!
If like me you’ve been using Site Scoped Conditional Access policies in SharePoint for sometime (Launched in Oct 2017!), then you may already have the required rules in Azure AD Conditional Access, as these were required to enable that functionality and these group scoped rules work in exactly the same way.
For those of you not familiar with Conditional Access, it’s a way of creating a set of policies that can be targeted at all or a subset of your users to control access to Azure AD Protected applications based on things like Who the user is, where they are logging in from, what device they are using and depending on your license even how “Risky” their logon is considered using AI derived algorithms.
For the purposes of what we want to achieve, we’re going to create a Conditional Access rule that covers the following key points:
- Is targeted at a Single Test User.
- Tests to see if the user is outside of the “Trusted locations” (e.g. outside the corporate perimeter)
- If the rule applies, access will be granted but final control will be passed to the application for it to control access (in this case SharePoint)
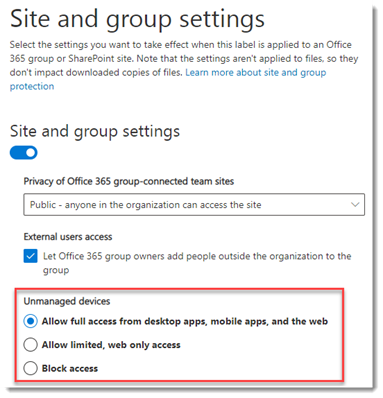
It’s that final stage that provides SharePoint the granular control over whether to allow the user in with Full or limited access, or to just block them outright. This maps directly to the ConditionalAccessPolicy property that can be configured on an SPSite object through PowerShell, with the following values.
Looking at the sites created during both Teams creation and SharePoint site creation with sensitivity labels, I’m seeing the same properties being configured under the hood, so it’s safe to assume the mechanisms of both this and classic Site Scoped access policies are the same.
These map directly to the permissions found in the Sensitivity Label configuration for Sites and Groups:
Assuming that we’ve created our site sensitivity labels and created a new Team, Group or Site using them, or decorated a SharePoint site with the conditional access policy shown above, how do we create the conditional access policy to enforce those behaviours?
- Open the Azure Portal and find the Azure AD Conditional Access blade. Click on New Policy and configure the following:
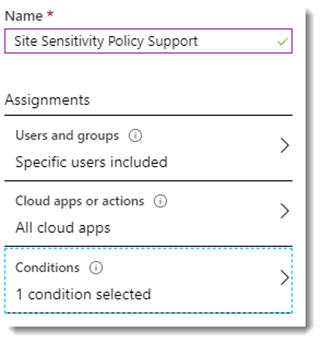
- Give your new policy a meaningful name, there’s a good chance your conditional access policy lists will grow quite large!
- Apply it to your test users and select which cloud apps, If you select just SharePoint, you’ll see a recommendation that you use the Office 365 App as a selection instead, ignore this and Select SharePoint anyway, if you don’t the Session Condition that we need is greyed out.
- Under conditions, if you have Trusted Locations configured to represent your internal perimeter devices, then configure the Conditional to EXCLUDE trusted locations. This means the policy will only apply if you are NOT in a trusted location.
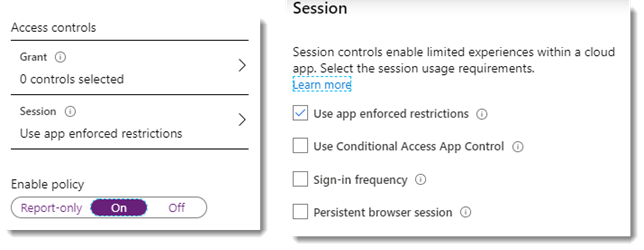
- In the Access Controls session, select the Session option and choose “Use App Enforced Restrictions”.
- Enable the policy and hit Create.
Now log on with your Test user from a non trusted location and try and access sites that you’ve configured with Full, Limited and Blocked access policies. You should find a mix of experiences based on each policy that you’ve set.
Note: These new policies take effect almost immediately, however if your test user has cached credentials and a valid token, they won’t take effect until that token expires, so make sure you test using an InPrivate browsing session!


